Daylilies are widely used and the most colorful and diverse perennial to decorate your garden. Growing them in the ground is pretty easy if you know how to plant daylilies in ground accurately.
To have the best and most beautiful daylilies, you must make your ground more friendly for the daylilies. That’s why you need to improve the soil condition and make them enriched with organic matter.
But this isn’t the only thing that’ll make the daylilies thrive in your garden. You need to know how often to water them as too much watering can rot the roots. Then when to plant, how to plant roots, and when to feed are also some major parts of planting daylilies successfully.
In the following discussion, we’ll provide you with a step-by-step guide on how you can plant daylilies easily in your outdoor garden.
How To Select A Daylily?
There are many species of daylilies available, and daylilies are mostly cultivated in North America. There are four things that you need to consider while choosing the daylilies for your garden.
- First, you need to choose according to your planting or blooming time. For example, a few daylilies prefer to grow best in the early season, while a few prefer to grow best in mid-season. Then there are also some species that are fond of growing best during the late season.
- Next, you need to consider which colored daylilies you want for your garden. There are few flowers that are only one color, like white, yellow, or red; similarly, a few daylily species are gradient in color, such as red to yellow, white to yellow, etc.
- The scape or flowering stem’s height is also an essential factor to consider while selecting daylilies. The maximum scape height is between 5 inches to 3 feet tall.
- The last key factor is the shape of the flowers. The flower form plays a significant role in increasing the beauty of your daylily garden. The common shape of daylily flowers are ruffled, trumpet, recurved, etc.
If you have enough space in your garden, choose all seasonal flowers. This way, your garden will keep blooming with different seasonal flowers around the year. Also, consider mixing colors, shapes, and heights to enjoy different species of daylilies every day.
Types Of Daylilies
Here are a few types of daylilies:
- Diploid: These types of daylilies are consistent with 22 chromosomes. Diploid daylilies have multiple but small flowers that have an old-fashioned form. Double-flowered daylilies are mostly known as diploids.
- Tetraploid: These daylilies contain 44 chromosomes in the plant. They bloom larger flowers compared to diploids, and the color of the flower is more intense. Plus, tetraploid daylilies have sturdier and stronger flower stems.
- Sun or Shade: These types of daylilies bloom 8 inches of flowers, and the flower’s color is hot pink to yellow with a white edge and bright green throat. The scape height is about 33 inches, and the flower form is unusual.
- Ruby Spider: These daylilies bloom beautiful large flowers, and their flower color is ruby red and starry blossom with attractive golden throats. Pretty irresistible. The flowers are about 22 cm wide. Ruby spider daylilies open during the morning and wither away at forthcoming night.
How To Plant Daylilies In Ground – Step by Step Process
Whether you plant daylilies in a container or in the ground, you must follow a step-by-step process to successfully plant daylilies. However, the process of planting daylilies in the container is different from planting in the ground. Propagate daylily is very important for planting in ground.
Daylilies are easy to grow; you just need to plant and maintain them accurately. Here’s how to plant daylilies:
● Step-1: Choose A Spot For Your Daylilies
The best spot for planting daylilies is under the sunlight. It’s because daylilies prefer to stay under direct sunlight for at least 6 hours a day. Sunlight increases their energy, which results in better flower display.
Now, what if you place them in a shaded place? Your daylilies will still build good foliage, but the plant will be unable to produce numerous flowers. Therefore, even if you choose a shaded place, make sure the place is somewhere the plants can get afternoon sunlight at least.
● Step-2: Preparing The Soil
Daylilies are energetic and can adapt to new soil quickly. But just because they adapt quickly doesn’t mean they will thrive best in any soil condition. The more soil is enriched with nutrition and adequate hydration, the better these plants will bloom.
You should select a place where the soil is well-drained. To check the drainage of the soil, dig a 1x1ft (WxD) hole, then fill water into it. If the soil drains the water within 10 to 15 minutes, it means the soil is well-drained; otherwise, you should look for another place.

Now another important part of soil preparation is adequate pH level. When you plant daylilies in the ground, daylilies would like to thrive best in slightly acidic soil of 6 and 7.
Consider buying a pH level soil testing kit and then adjust the pH level accordingly.
- If the soil pH level is lower than 6, consider adding limestone to increase the pH level.
- If the pH level is higher than 7, consider adding sphagnum peat moss, sulfur, or sulfate to decrease and adjust the pH level.
Now add potting soil and other compost to finish preparing the soil. In case you have sandy or heavy clay soil in your garden, consider adding a good amount of organic matter to improve the soil.
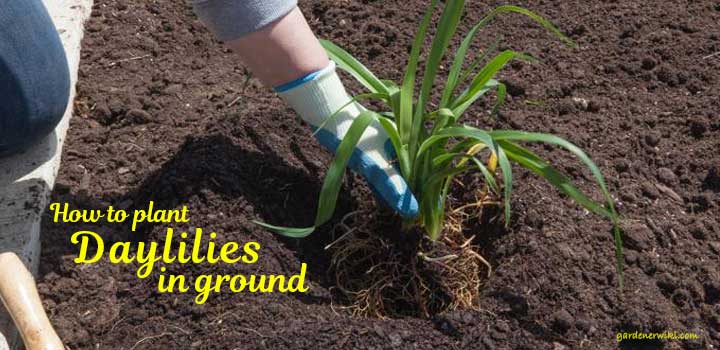
● Step-3: Planting The Daylily
The best time to plant daylilies is during the early fall or early spring. Daylilies go resting in the winter season as they’re perennials and come back when the spring comes.
Now till the soil is about 18 inches deep and remove all rocks and debris from the ground. Then dig about a12x12ft hole for planting the roots. This much depth will be enough to plant the roots smoothly without crowing or bending them.
Hold the roots by the crown (where the roots and stems meet), then gently place them into the hole. Ensure that the crown is about 1.4 cm below the ground’s top line.
Then pour back the soil to refill the hole around the roots. Make sure you don’t press the soil too hard, leave the soil loose.
Another thing that you need to ensure is that you don’t plant another daylily plant beside the plant you previously planted. Daylilies dislike competition, so maintain a distance between 12 to 18 inches in the middle of each plant.
● Step-4: Water Deeply, But Not Too Often
Just like other plants, watering daylilies is also an essential part of planting daylilies in the ground. Right after you plant the root division, water the plants thoroughly. However, be gentle while pouring the water since you don’t want to make the soil rigid for roots.
Moreover, daylilies are fond of hydrated soil, not soggy soil. The roots of the plant are pretty weak, so they have a lower moisture tolerance.
Consider watering the plants every day during drought and extreme summer conditions. Again, water once or twice a week during the winter season.
● Step-5: Mulching
If you belong to a winter region and want to plant daylilies in your garden, you should mulch the soil as winter protection. Daylilies also prefer organic mulch during the summer season.
Compost, rotten leaves, manure, and any other good-quality mulch to improve the soil positively. Mulch will keep the soil hydrated and also works on foliage and flowers to prevent splashing.
Apply mulch after planting the roots on the top of the soil’ just make sure you don’t cover the plant crown with mulch.
However, apply about 4 to 6 inches of a thick layer of mulch during the winter to protect the plants.
● Step-6: Fertilizing
Feeding fertilizer to your daylilies is as important as preparing the soil. Fertilizers help the plants to grow faster, healthier, and more beautiful. It can be found in liquid and powder form to improve your soil.
Consider applying fertilizer during the spring to boost the growth till the blooming in the summer. You can use any type of organic fertilizer for daylilies as long as the fertilizer has a low nitrogen level.
● Step-7: Deadheading
This is the last step of planting daylilies, but this step is post-planting care. Deadheading is the process of removing dead flowers or dead plants. And you should perform this step when the flowers have done blooming and started to fade away.
This step will encourage daylilies to regrow energetic plants and bloom new flowers. All you need to do is cut the flower heading using a scissor, and you’re done.
FAQs
Why are the green leaves of the daylily turning into yellow leaves?
This condition generally arises when you frequently put in too much water or over-fertilizing. Once the daylilies are established in the ground, all you need to do is feed them fertilizer, wearing as required, and deadheading. So avoid watering daylilies too often after they are totally grown up.
What is the lifespan of daylilies?
Daylilies are pretty energetic and hardy, which allows these plants to leave for years after years. After planting, the daylilies will survive for a maximum of three years if you DON’T take care of them. Otherwise, you can keep growing the same plant for over five years with care and proper maintenance.
Do daylilies bloom only once?
No, daylilies will return every year if you help them to grow healthily. Daylilies are pretty irresistible, and if you maintain them carefully with minimum care, you’ll see your daylilies blooming again in the next year, even during drought situations.
Conclusion
So you now know the step-by-step process of how to plant daylilies in ground and how to select them easily. Choosing daylilies is pretty straightforward. Just make sure if you mix seasonal daylilies, then you keep the amount of early, mid, and later season’s daylilies even.
This way, your garden will be filled with flowers throughout the year, and the even number of plants won’t make your garden look empty.
However, be cautious about the place of planting your daylilies. It plays a significant role in how your daylilies look in your yard. Happy gardening!